[AWS 무료 서버구축-18/18] 메모앱 만들기 - frontend vue.js

Setup/aws|2021. 7. 25. 18:15

메모앱 만들기 - frontend vue.js

aws 에 프리티어 서버를 만들고 도메인을 발급받고 jdk 를 설치하고 springboot app 까지 만든이유는 결국 vue.js로 화면을 만들기 위함 입니다. 초간단 메모 app을 만들어 보겠습니다.

화면디자인

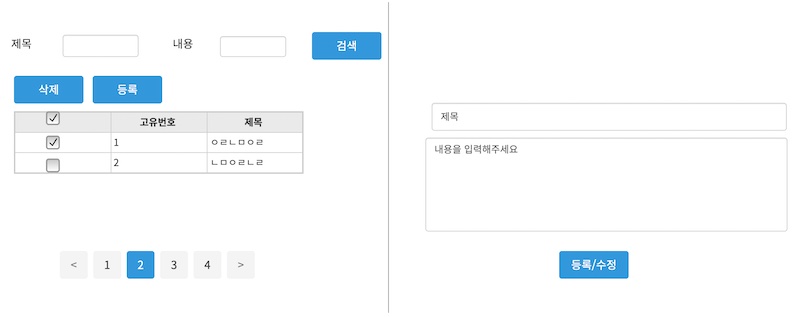
만들화면에 대해서 대략적인 화면설계를 해보았습니다.

  • 제목 내용에 해당하는 메모를 검색합니다.
  • 체크박스 체크된 메모를 선택하고 삭제버튼을 클릭하면 체크된 메모를 삭제합니다.
  • 등록 버튼을 클릭하면 우측의 등록 화면의 제목쪽으로 포커스를 이동합니다.
  • 등록 버튼을 클릭하면 메모가 등록되고 좌측에 메모가 하나 추가 됩니다.
  • 페이지 번호를 클릭하면 해당 페이지에 속하는 메모가 리스트업 됩니다.
  • 좌측 메모리스트에서 row를 클릭하면 우측에 제목과 내용이 보이고 수정모드로 변합니다.
  • 수정모드에서 수정 버튼을 클릭하면 메모가 수정되고 수정된 내용이 좌측 리스트에 반영됩니다.
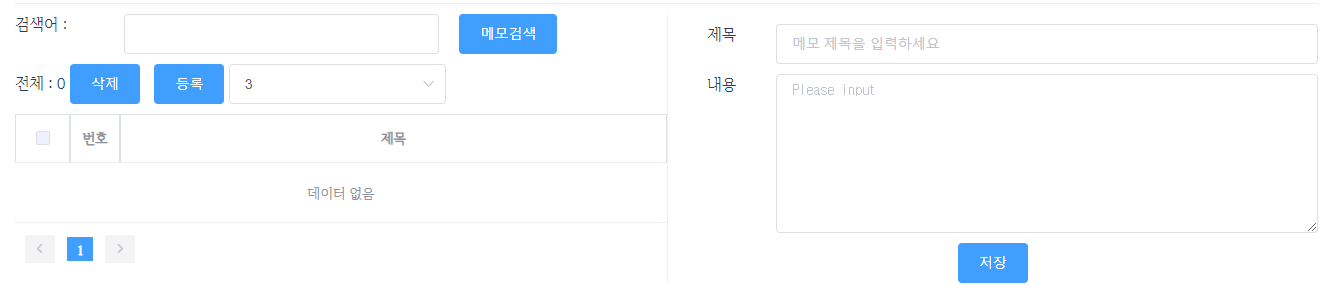
화면개발

위 화면 설계서 되로 아래와 같이 화면을 개발해 보았습니다. 개발하다가 조금더 욕심이 생겨 전체 갯수도 표시하고 한페이지당 보여줄 갯수도 변경했습니다. 등록/검색 버튼을 클릭하여 app 이 제되로 동작하는 확인해 보세요. 참고로 아래 ui 컴포넌트는 element ui를 이용하여 개발 했습니다.


backend 서비스 수정

위 화면에서 사용하는 backend 관련 수정파일은 아래와 같습니다.  이전 강좌에서 아래 4개 파일만 수정하시고 수정되면 동일한 요령으로 build 해서 서버에 배포 하고 서비스를 재시작 합니다.


.
├── build.gradle
└── src
    └── main
        ├── java
        │ └── io
        │     └── github
        │         └── goodsaem
        │             └── api
        │                 ├── ApiApplication.java
        │                 ├── config
        │                 │ └── WebConfig.java
        │                 ├── controller
        │                 │ └── v1
        │                 │     └── MemoController.java
        │                 ├── entity
        │                 │ └── Memo.java
        │                 ├── repo
        │                 │ └── MemoJpaRepo.java
        │                 └── service
        │                     ├── IMemoService.java
        │                     └── MemoService.java
        └── resources
            ├── application.yml
            ├── banner.txt
            └── templates

MemoController.java

메모 검색 및 페이징 처리를 위해서 아래와 같이 /memo/search 컨트롤러를 추가했습니다. pageable jpa에서 지원해주는 객체로 페이징 처리를 위해 필요한 값 페이지당 보여줄 row 수와 현재페이지 정보를 넘겨주면 알아서 가져올 데이터량을 줄여 줍니다. 즉 query에 offset 과 limit 문장이 추가됩니다.

눈여겨 보아야 되는 부분은 다건 삭제 부분입니다. 삭제 기능은 여러건을 넘겨서 일괄 삭제하는데 pathVariable 로 /spring/v1/memo/1,2,3 이런씩으로 넘기면 이를 List로 받아서 for문을 돌리면서 하나씩 삭제 하는 부분입니다.

package io.github.goodsaem.api.controller.v1;

import io.github.goodsaem.api.entity.Memo;
import io.github.goodsaem.api.service.IMemoService;
import lombok.RequiredArgsConstructor;
import lombok.extern.slf4j.Slf4j;
import org.springframework.data.domain.Page;
import org.springframework.data.domain.Pageable;
import org.springframework.data.web.PageableDefault;
import org.springframework.web.bind.annotation.*;

import java.util.List;

@RequiredArgsConstructor
@RestController
@RequestMapping(value = "/v1")
@Slf4j
public class MemoController {
    private final IMemoService iMemoService;

    @GetMapping(value = "/memo/search")
    public Page<Memo> searchMemo(@RequestParam String keyword, @PageableDefault(size=3,sort="id") Pageable pageable) {
        return iMemoService.searchMemo(keyword,pageable);
    }

    @GetMapping(value = "/memos")
    public List<Memo> readMemos() {
        return iMemoService.readMemos();
    }

    @GetMapping(value = "/memo/{id}")
    public Memo readMemo(@PathVariable long id) {
        return iMemoService.readMemo(id);
    }

    @PostMapping(value = "/memo")
    public Memo createMemo(@RequestBody Memo memo) {
        return iMemoService.createMemo(memo.getTitle(), memo.getContents());
    }

    @PutMapping(value = "/memo")
    public Memo updateMemo(@RequestBody Memo memo) {
        return iMemoService.updateMemo(memo.getId(), memo.getTitle(), memo.getContents());
    }

    @DeleteMapping(value = "/memo/{id}")
    public void deleteMemo(@PathVariable long id) {
        iMemoService.deleteMemo(id);
    }

    @DeleteMapping(value = "/memos/{ids}")
    public void deleteMemos(@PathVariable("ids") List<Long> ids) {
        for(Long id:ids) {
            iMemoService.deleteMemo(id);
        }
    }
}


MemoJpaRepo.java

검색조건을 가져오는 부분을 아래와 같이 @Query를 통해서 작성해 보았습니다. 이렇게 진행하지 않고 세련되게 작성하는 방법도 있을것 같은데 아직 jpa에 익숙하지 않아 내공이 쌓이면 따로 정리하겠습니다. 화면에서 검색어 keyword가 전달되면 제목 및 내용에서 찾는 간단한 sql 입니다. 정렬은 가장 마지막에 등록한 메모가 보이게 했구요 countQuery도 같이 작성하여 페이징 처리시 참고 합니다.

package io.github.goodsaem.api.repo;

import io.github.goodsaem.api.entity.Memo;
import org.springframework.data.domain.Page;
import org.springframework.data.domain.Pageable;
import org.springframework.data.jpa.repository.JpaRepository;
import org.springframework.data.jpa.repository.Query;

public interface MemoJpaRepo extends JpaRepository<Memo, Long> {
    Page<Memo> findAll(Pageable pageable);

    @Query(
        value = "SELECT m FROM Memo m WHERE m.title LIKE %:keyword% OR m.contents LIKE %:keyword% ORDER BY m.id DESC",
        countQuery = "SELECT COUNT(m.id) FROM Memo m WHERE m.title LIKE %:keyword% OR m.contents LIKE %:keyword%"
    )
    Page<Memo> findAllSearch(String keyword,Pageable pageable);
}


IMemoService.java

메모 검색을 사용하기 위한 searchMemo 메소드를 추가했습니다.

package io.github.goodsaem.api.service;
import io.github.goodsaem.api.entity.Memo;
import org.springframework.data.domain.Page;
import org.springframework.data.domain.Pageable;

import java.util.List;
public interface IMemoService {
    List<Memo> readMemos();
    Page<Memo> searchMemo(String keyword, Pageable pageable);
    Memo readMemo(long id);
    Memo createMemo(String title,String contents);
    Memo updateMemo(long id,String title,String contents);
    void deleteMemo(long id);
}


MemoService.java

메모 서비스에서 메모를 검색하는 부분을 구현했습니다.

package io.github.goodsaem.api.service;

import io.github.goodsaem.api.entity.Memo;
import io.github.goodsaem.api.repo.MemoJpaRepo;
import lombok.RequiredArgsConstructor;
import lombok.extern.slf4j.Slf4j;
import org.springframework.beans.factory.annotation.Autowired;
import org.springframework.data.domain.Page;
import org.springframework.data.domain.Pageable;
import org.springframework.stereotype.Service;

import java.util.List;

@Slf4j
@Service
@RequiredArgsConstructor
public class MemoService implements IMemoService {
    private final MemoJpaRepo memoJpaRepo;

    @Override
    public List<Memo> readMemos() {
        return memoJpaRepo.findAll();
    }

    @Override
    public Page<Memo> searchMemo(String keyword, Pageable pageable) {
        Page<Memo> memo = memoJpaRepo.findAllSearch(keyword,pageable);
        return memo;
    }

    @Override
    public Memo readMemo(long id) {
        return memoJpaRepo.findById(id).orElse(null);
    }

    @Override
    public Memo createMemo(String title, String contents) {
        Memo memo = Memo.builder()
                .title(title)
                .contents(contents)
                .build();

        return memoJpaRepo.save(memo);
    }

    @Override
    public Memo updateMemo(long id, String title, String contents) {

        Memo memo = Memo.builder()
                .id(id)
                .title(title)
                .contents(contents)
                .build();

        return memoJpaRepo.save(memo);
    }

    @Override
    public void deleteMemo(long id) {
        memoJpaRepo.deleteById(id);
    }
}


FrontEnd 소스 상세설명


MemoCreate.vue

위 화면중 우측 부분 내용으로 메모를 등록하는 폼은 다른 화면에서 사용할수 있을것 같아 별도의 컴포넌트로 분리했습니다. MemoCreate를 호출하는 부모 컨포넌트는 memo 모델을 넘겨줍니다. 그럼 memo 모델의 값을 복제해서 화면에서 활용하고 데이터 수정이 끝나고 저장 버튼을 누르면 상위 컴포넌트에게 save 되었다고 알려(emit) 줍니다. 자세한 내용은 vue 강좌 때 다시 설명하겠습니다.

<template>
  <div style="margin-top: 10px">
    <el-row>
      <el-col :span="4" align="center">
        제목
      </el-col>
      <el-col :span="20">
        <el-input ref="title" placeholder="메모 제목을 입력하세요" v-model="memo.title"></el-input>
      </el-col>
    </el-row>
    <el-row style="margin-top: 10px">
      <el-col :span="4" align="center">
        내용
      </el-col>
      <el-col :span="20">
        <el-input
            type="textarea"
            :rows="7"
            placeholder="Please input"
            v-model="memo.contents">
        </el-input>
      </el-col>
    </el-row>
    <el-row style="margin-top: 10px">
      <el-col :span="24" align="center">
        <el-button type="primary" @click="saveMemo">저장</el-button>
      </el-col>
    </el-row>
  </div>
</template>
<script>
export default {
  name: "MemoCreate",
  props : {
    model : {
      type : Object,
    }
  },
  created() {
  },
  data() {
    return {
      memo : {
        id : -1,
        title : '',
        contents : '',
      },
    }
  },
  methods: {
    create() {
    },
    saveMemo() {
      this.$emit("save",this.memo)
    }
  },
  watch: {
    model(model)  {
      this.memo = Object.assign({},model);
      this.$refs.title.focus();
    }
  }
}
</script>
<style scoped></style>

Exam5.vue

검색 및 결과를 출력하는 컴포넌트 입니다. 화면을 그리는 부분 빼고 실제 코딩은 많지 않습니다. 

<template>
  <div style="margin-top: 10px">
    <el-row>
      <el-col :span="12">
        <el-row>
          <el-col :span="4" style="padding-right: 10px;">
            검색어 :
          </el-col>
          <el-col :span="12" style="padding-right: 10px;">
            <el-input @change="searchMemo"  v-model="keyword"></el-input>
          </el-col>
          <el-col :span="8" style="padding-left: 10px;">
            <el-button type="primary" @click="searchMemo">메모검색</el-button>
          </el-col>
        </el-row>
        <el-row style="margin-top: 10px">
          <el-col>
            전체 : {{ total }}
            <el-button type="primary" @click="deleteMemo">삭제</el-button>
            <el-button type="primary" @click="createMemo">등록</el-button>
            <el-select v-model="size"
                       placeholder="한페이지당 row수"
                       @change="searchMemo"
            >
              <el-option
                  v-for="(row,index) in 100"
                  :key="index"
                  :label="row"
                  :value="row">
              </el-option>
            </el-select>
          </el-col>
        </el-row>
        <el-row style="margin-top: 10px">
          <el-col>
            <el-row>
              <el-table
                  ref="table"
                  v-if="gridData.length >= 0"
                  @row-click="rowClick"
                  :data="gridData"
                  style="width: 100%">
                <el-table-column
                    type="selection"
                    align="center"
                    width="55">
                </el-table-column>
                <el-table-column
                    prop="id"
                    align="center"
                    label="번호"
                    width="50">
                </el-table-column>
                <el-table-column
                    prop="title"
                    label="제목"
                    header-align="center"
                    style="width: 95%">
                </el-table-column>
              </el-table>
            </el-row>
            <el-row style="margin-top: 10px">
              <el-col>
                <el-pagination
                    background
                    layout="prev, pager, next"
                    @current-change="chgPage"
                    :current-page="page+1"
                    :page-size="size"
                    :total="total">
                </el-pagination>
              </el-col>
            </el-row>
          </el-col>
        </el-row>
      </el-col>
      <el-col :span="12" style="border-left: 1px solid #efefef;">
        <memo-create :model="memo" @save="saveMemo"/>
      </el-col>
    </el-row>
  </div>
</template>
<script>
const URL = "https://goodsaem.ml/spring";
//const URL = "http://localhost:9090/spring";
import MemoCreate from "./MemoCreate";

export default {
  name: "Exam5",
  created() {
  },
  components: {
    MemoCreate
  },
  data() {
    return {
      page: 0,
      size : 3,
      total : 0,
      keyword: '',
      memo: {
        title: '',
        contents: '',
      },
      gridData: [],
    }
  },
  methods: {
    create() {
    },
    rowClick(v) {
      this.memo = v;
    },
    chgPage(page) {
      this.page=page-1
      this.searchMemo();
    },
    saveMemo(memo) {
      if (memo.id === -1) {
        this.$http.post(URL + '/v1/memo', memo).then((response) => {
          this.searchMemo();
        })
      } else {
        this.$http.put(URL + '/v1/memo', memo).then((response) => {
          this.searchMemo();
        })
      }
    },
    createMemo() {
      this.memo = Object.assign({
        id : -1,
        title : '',
        contents : '',
      })
    },
    deleteMemo() {
      let ids = "";
      this.$refs.table.selection.map(r => ids += r.id + ",");
      ids = ids.substring(0,ids.length-1);

      if(this.$refs.table.selection.length > 0) {
        this.$http.delete(URL + '/v1/memos/' + ids)
            .then((response) => {
              this.$message("정상적으로 삭제되었습니다.");
              this.searchMemo();
            })
      }
    },
    searchMemo() {
      this.$http.get(URL + '/v1/memo/search', {
        params: {
          keyword : this.keyword,
          page: this.page,
          size: this.size,
        }
      })
      .then((response) => {
        console.log(response)
        this.gridData = response.data.data.content;
        this.total = response.data.totalElements;
      })
    }
  }
}
</script>
<style scoped></style>

마치며

AWS에 프리티어 서버를 셋업하고 spring boot 로 백엔드를 만들고 fontend 는 vue.js 를통해서 앱을 만들어 보았습니다.

긴글 읽어 주셔서 감사합니다.

댓글()

[AWS 무료 서버구축-17/18] 메모앱 만들기 - backend 서비스 만들기

Setup/aws|2021. 7. 25. 17:31

메모앱 만들기

지금까지 구축한 aws 서버위에 간단한 메모 application을 만들어서 배포 하겠습니다


테이블 생성 및 초기데이터 적재

테이블을 생성하고 초기 데이터를 인서트 합니다.

아래 스크립트는 aws 의 mariadb 에서 실행합니다.

먼저 메모 테이블을 생성합니다.

CREATE TABLE `memo` (
  `id` bigint(20) NOT NULL,
  `contents` varchar(4000) NOT NULL,
  `title` varchar(200) NOT NULL,
  PRIMARY KEY (`id`)
) ENGINE=InnoDB DEFAULT CHARSET=utf8mb4;

자동증가 시퀀스 테이블을 만듭니다.

CREATE TABLE `hibernate_sequence` (
  `next_val` bigint(20) DEFAULT NULL
) ENGINE=InnoDB DEFAULT CHARSET=utf8mb4;

초기 데이터를 생성합니다.

INSERT INTO memo (id, contents, title) VALUES(1, '내용1', '제목1');
INSERT INTO memo (id, contents, title) VALUES(2, '내용2', '제목2');
INSERT INTO memo (id, contents, title) VALUES(3, '내용3', '제목3');

INSERT INTO hibernate_sequence (next_val) VALUES(4);


앱구조

springboot application 구조는 아래와 같습니다.

.
├── build.gradle
└── src
    └── main
        ├── java
        │ └── io
        │     └── github
        │         └── goodsaem
        │             └── api
        │                 ├── ApiApplication.java
        │                 ├── config
        │                 │ └── WebConfig.java
        │                 ├── controller
        │                 │ └── v1
        │                 │     └── MemoController.java
        │                 ├── entity
        │                 │ └── Memo.java
        │                 ├── repo
        │                 │ └── MemoJpaRepo.java
        │                 └── service
        │                     ├── IMemoService.java
        │                     └── MemoService.java
        └── resources
            ├── application.yml
            ├── banner.txt
            └── templates


build.gradle

특별한 내용은 없고 springboot 2.4.4 버전 사용 및 mariadb 와 jpa 라이브러리 추가및 lombok 플러그인을 추가했습니다.

buildscript {
	ext {
		springBootVersion = '2.4.4'
	}
	repositories {
		mavenCentral()
	}
	dependencies {
		classpath(
				"org.springframework.boot:spring-boot-gradle-plugin:${springBootVersion}")
	}
}

apply plugin: 'org.springframework.boot'
apply plugin: 'war'
apply plugin: 'io.spring.dependency-management'
sourceCompatibility = '1.8'
targetCompatibility = '1.8'

group = 'io.github.goodsaem'
version = '1.1'

configurations {
	compileOnly {
		extendsFrom annotationProcessor
	}
}

repositories {
	mavenCentral()
}

dependencies {
	implementation 'org.springframework.boot:spring-boot-starter-data-jpa'
	implementation 'org.springframework.boot:spring-boot-starter-web'
	implementation 'org.springframework.boot:spring-boot-autoconfigure'
	implementation("org.mariadb.jdbc:mariadb-java-client")

	compileOnly 'org.projectlombok:lombok'
	annotationProcessor 'org.projectlombok:lombok'
	testImplementation 'org.springframework.boot:spring-boot-starter-test'
}

test {
	useJUnitPlatform()
}


ApiApplication.java

springboot 시작 파일 입니다.

package io.github.goodsaem.api;
import org.springframework.boot.SpringApplication;
import org.springframework.boot.autoconfigure.SpringBootApplication;

@SpringBootApplication
public class ApiApplication {

	public static void main(String[] args) {
		SpringApplication.run(ApiApplication.class, args);
	}
}


WebConfig.java

CORS 설정 파일입니다. 허용할 도메인에 대해서 아래와 같이 정의 합니다.

package io.github.goodsaem.api.config;

import org.springframework.context.annotation.Configuration;
import org.springframework.web.servlet.config.annotation.CorsRegistry;
import org.springframework.web.servlet.config.annotation.WebMvcConfigurer;

@Configuration
public class WebConfig implements WebMvcConfigurer {
    @Override
    public void addCorsMappings(CorsRegistry registry) {
        registry.addMapping("/**")
                .allowedOrigins("https://goodsaem.github.io","http://localhost:8080")
                .allowedMethods("GET", "POST", "PUT", "PATCH", "DELETE","OPTIONS");
    }
}


MemoController.java

restapi controller 입니다. 메모의 crud url 을 호출하면 해당 요청에 맞는 서비스를 호출하여 db 작업을 수행합니다

package io.github.goodsaem.api.controller.v1;

import io.github.goodsaem.api.entity.Memo;
import io.github.goodsaem.api.service.IMemoService;
import lombok.RequiredArgsConstructor;
import org.springframework.web.bind.annotation.*;

import java.util.List;

@RequiredArgsConstructor
@RestController
@RequestMapping(value = "/v1")
public class MemoController {
    private final IMemoService iMemoService;

    @GetMapping(value = "/memos")
    public List<Memo> readMemos() {
        return iMemoService.readMemos();
    }

    @GetMapping(value = "/memo/{id}")
    public Memo readMemo( @PathVariable long id) {
        return iMemoService.readMemo(id);
    }

    @PostMapping(value = "/memo")
    public Memo createMemo(@RequestParam String title,String contents) {
        return iMemoService.createMemo(title,contents);
    }

    @PutMapping(value = "/memo")
    public Memo updateMemo(@RequestParam long id, @RequestParam String title,String contents) {
        return iMemoService.updateMemo(id,title,contents);
    }

    @DeleteMapping(value="/memo/{id}")
    public void deleteMemo(@PathVariable long id) {
        iMemoService.deleteMemo(id);
    }

    @DeleteMapping(value="/memos")
    public void deleteMemos() {
        iMemoService.deleteMemos();
    }
}


Memo.java

memo entity 입니다.

package io.github.goodsaem.api.entity;

import lombok.*;
import javax.persistence.*;

@Builder
@Entity
@Setter
@Getter
@NoArgsConstructor
@AllArgsConstructor
@Table(name="memo")
public class Memo {
    @Id
    @GeneratedValue(strategy = GenerationType.AUTO)
    private long id;

    @Column(nullable = false, length = 30)
    private String title;

    @Column(nullable = false, length = 4000)
    private String contents;
}


MemoJpaRepo.java

jpa를 사용하기 위해 jparepository를 상속 받습니다.

package io.github.goodsaem.api.repo;

import io.github.goodsaem.api.entity.Memo;
import org.springframework.data.jpa.repository.JpaRepository;

public interface MemoJpaRepo extends JpaRepository<Memo, Long> {
}


IMemoService.java

서비스 인터페이스 입니다.

package io.github.goodsaem.api.service;
import io.github.goodsaem.api.entity.Memo;
import java.util.List;
public interface IMemoService {
    List<Memo> readMemos();
    Memo readMemo(long id);
    Memo createMemo(String title,String contents);
    Memo updateMemo(long id,String title,String contents);
    void deleteMemo(long id);
    void deleteMemos();
}


MemoService.java

jpaRepo로 실제 crud 작업을 수행합니다.

package io.github.goodsaem.api.service;

import io.github.goodsaem.api.entity.Memo;
import io.github.goodsaem.api.repo.MemoJpaRepo;
import lombok.RequiredArgsConstructor;
import lombok.extern.slf4j.Slf4j;
import org.springframework.stereotype.Service;
import java.util.List;

@Slf4j
@Service
@RequiredArgsConstructor
public class MemoService implements IMemoService {
    private final MemoJpaRepo memoJpaRepo;

    @Override
    public List<Memo> readMemos() {
        return memoJpaRepo.findAll();
    }

    @Override
    public Memo readMemo(long id) {
        return memoJpaRepo.findById(id).orElse(null);
    }

    @Override
    public Memo createMemo(String title, String contents) {
        Memo memo = Memo.builder()
                .title(title)
                .contents(contents)
                .build();

        return memoJpaRepo.save(memo);
    }

    @Override
    public Memo updateMemo(long id, String title, String contents) {

        Memo memo = Memo.builder()
                .id(id)
                .title(title)
                .contents(contents)
                .build();

        return memoJpaRepo.save(memo);
    }

    @Override
    public void deleteMemo(long id) {
        memoJpaRepo.deleteById(id);
    }

    @Override
    public void deleteMemos() {
        memoJpaRepo.deleteAll();
    }
}


application.yml

appplication 설정 내용으로 mariadb 연결정보와 서비스 포트 context path 설정정보를 가지고 있습니다.

server:
  port: 9090
  servlet:
    context-path: /spring
    session:
      timeout: 60
      tomcat:
        uri-encoding: UTF-8

spring:
  datasource:
    driver-class-name: org.mariadb.jdbc.Driver
    url: jdbc:mariadb://localhost:3306/goodsaem?useSSL=false&serverTimezone=KST
    username: goodsaem
    password: xxxxxxxxxx
  jpa:
    database-platform: org.hibernate.dialect.MariaDBDialect
    properties.hibernate.hbm2ddl.auto: none
    showSql: true


banner.txt

spring boot 시작시 사용할 배너 입니다.

※ 배너는 http://patorjk.com/software/taag/#p=display&f=Graffiti&t=Type%20Something%20 여기에서 만들수 있습니다.

 ██████╗  ██████╗  ██████╗ ██████╗ ███████╗ █████╗ ███████╗███╗   ███╗
██╔════╝ ██╔═══██╗██╔═══██╗██╔══██╗██╔════╝██╔══██╗██╔════╝████╗ ████║
██║  ███╗██║   ██║██║   ██║██║  ██║███████╗███████║█████╗  ██╔████╔██║
██║   ██║██║   ██║██║   ██║██║  ██║╚════██║██╔══██║██╔══╝  ██║╚██╔╝██║
╚██████╔╝╚██████╔╝╚██████╔╝██████╔╝███████║██║  ██║███████╗██║ ╚═╝ ██║
 ╚═════╝  ╚═════╝  ╚═════╝ ╚═════╝ ╚══════╝╚═╝  ╚═╝╚══════╝╚═╝     ╚═╝
:: Spring Boot ::                         ver : ${spring-boot.version}


api-1.1.war 파일 만들기

프로젝트 시작 home 디렉토리에서 아래 명령어를 입력하여 war 파일을 만듭니다.

sh gradlew build


war file 업로드

aws 서버에 api-1.1.war 파일을 업로드 합니다.


springboot 재시작

aws 서버에 접속한후 아래 명령어를 입력합니다.

서비스 중지

ubuntu@goodsaem:~$ ./stop.sh
=====spring is running at 5808 Shutdown spring now


서비스 시작

ubuntu@goodsaem:~$ ./start.sh;./log.sh


시작 로그

 ██████╗  ██████╗  ██████╗ ██████╗ ███████╗ █████╗ ███████╗███╗   ███╗
██╔════╝ ██╔═══██╗██╔═══██╗██╔══██╗██╔════╝██╔══██╗██╔════╝████╗ ████║
██║  ███╗██║   ██║██║   ██║██║  ██║███████╗███████║█████╗  ██╔████╔██║
██║   ██║██║   ██║██║   ██║██║  ██║╚════██║██╔══██║██╔══╝  ██║╚██╔╝██║
╚██████╔╝╚██████╔╝╚██████╔╝██████╔╝███████║██║  ██║███████╗██║ ╚═╝ ██║
 ╚═════╝  ╚═════╝  ╚═════╝ ╚═════╝ ╚══════╝╚═╝  ╚═╝╚══════╝╚═╝     ╚═╝
:: Spring Boot ::                         ver : 2.4.4
2021-03-27 17:10:46.869  INFO 7734 --- [           main] io.github.goodsaem.api.ApiApplication    : Starting ApiApplication using Java 1.8.0_282 on goodsaem with PID 7734 (/home/ubuntu/api-1.1.war started by ubuntu in /home/ubuntu)
2021-03-27 17:10:46.874  INFO 7734 --- [           main] io.github.goodsaem.api.ApiApplication    : No active profile set, falling back to default profiles: default
2021-03-27 17:10:48.714  INFO 7734 --- [           main] .s.d.r.c.RepositoryConfigurationDelegate : Bootstrapping Spring Data JPA repositories in DEFAULT mode.
2021-03-27 17:10:48.852  INFO 7734 --- [           main] .s.d.r.c.RepositoryConfigurationDelegate : Finished Spring Data repository scanning in 121 ms. Found 1 JPA repository interfaces.
2021-03-27 17:10:50.415  INFO 7734 --- [           main] o.s.b.w.embedded.tomcat.TomcatWebServer  : Tomcat initialized with port(s): 9090 (http)
2021-03-27 17:10:50.442  INFO 7734 --- [           main] o.apache.catalina.core.StandardService   : Starting service [Tomcat]
2021-03-27 17:10:50.446  INFO 7734 --- [           main] org.apache.catalina.core.StandardEngine  : Starting Servlet engine: [Apache Tomcat/9.0.44]
2021-03-27 17:10:51.931  INFO 7734 --- [           main] o.a.c.c.C.[.[localhost].[/spring]        : Initializing Spring embedded WebApplicationContext
2021-03-27 17:10:51.932  INFO 7734 --- [           main] w.s.c.ServletWebServerApplicationContext : Root WebApplicationContext: initialization completed in 4908 ms
2021-03-27 17:10:52.874  INFO 7734 --- [           main] o.hibernate.jpa.internal.util.LogHelper  : HHH000204: Processing PersistenceUnitInfo [name: default]
2021-03-27 17:10:52.986  INFO 7734 --- [           main] org.hibernate.Version                    : HHH000412: Hibernate ORM core version 5.4.29.Final
2021-03-27 17:10:53.296  INFO 7734 --- [           main] o.hibernate.annotations.common.Version   : HCANN000001: Hibernate Commons Annotations {5.1.2.Final}
2021-03-27 17:10:53.661  INFO 7734 --- [           main] com.zaxxer.hikari.HikariDataSource       : HikariPool-1 - Starting...
2021-03-27 17:10:53.804  INFO 7734 --- [           main] com.zaxxer.hikari.HikariDataSource       : HikariPool-1 - Start completed.
2021-03-27 17:10:53.848  INFO 7734 --- [           main] org.hibernate.dialect.Dialect            : HHH000400: Using dialect: org.hibernate.dialect.MariaDBDialect
2021-03-27 17:10:54.767  INFO 7734 --- [           main] o.h.e.t.j.p.i.JtaPlatformInitiator       : HHH000490: Using JtaPlatform implementation: [org.hibernate.engine.transaction.jta.platform.internal.NoJtaPlatform]
2021-03-27 17:10:54.779  INFO 7734 --- [           main] j.LocalContainerEntityManagerFactoryBean : Initialized JPA EntityManagerFactory for persistence unit 'default'
2021-03-27 17:10:55.548  WARN 7734 --- [           main] JpaBaseConfiguration$JpaWebConfiguration : spring.jpa.open-in-view is enabled by default. Therefore, database queries may be performed during view rendering. Explicitly configure spring.jpa.open-in-view to disable this warning
2021-03-27 17:10:55.822  INFO 7734 --- [           main] o.s.s.concurrent.ThreadPoolTaskExecutor  : Initializing ExecutorService 'applicationTaskExecutor'
2021-03-27 17:10:56.395  INFO 7734 --- [           main] o.s.b.w.embedded.tomcat.TomcatWebServer  : Tomcat started on port(s): 9090 (http) with context path '/spring'
2021-03-27 17:10:56.413  INFO 7734 --- [           main] io.github.goodsaem.api.ApiApplication    : Started ApiApplication in 10.795 seconds (JVM running for 11.987)


웹브라우저에서 확인

https://goodsaem.ml/spring/v1/memosurl 접근했을때 아래와 같은 문자열이 출력되면 정상입니다.

[
  {
    "id": 1,
    "title": "제목1",
    "contents": "내용1"
  },
  {
    "id": 2,
    "title": "제목2",
    "contents": "내용2"
  },
  {
    "id": 3,
    "title": "제목3",
    "contents": "내용3"
  }
]


전체소스 다운로드

지금까지 만든 소스는 아래 링크를 통해서 다운로드 가능합니다.

api2.zip
0.13MB

댓글()

[AWS 무료 서버구축-16/18] SpringBoot 백그라운드에서 실행하기

Setup/aws|2021. 7. 25. 16:50

SpringBoot 백그라운드에서 실행하기

아래 명령어로 샘플 프로젝트를 실행하면 foreground 로 명령어가 실행됩니다. ctrl + c 키를 눌러서 종료하면 프로세스가 종료됩니다. 명령어를 실행하고 나서 로그아웃을 하더라도 명령어가 계속 실행된 상태로 있을려면 background 로 명령어가 실행되어야 합니다. 

java -jar hello-0.0.1-SNAPSHOT.war

background로 실행하는 프로세스를 만들기 위해 아래와 같이 start.sh 파일을 생성합니다.

ubuntu@goodsaem:~$ vi start.sh

nohup을 사용하여 출력을 nohup.out으로 보내고 명령어를 실행한다음 & 같이 입력하여 백그라운드에서 실행 되게 만듭니다.

nohup java -jar hello*.war &

그리고 나서 start.sh 실행 권한을 부여 합니다.

ubuntu@goodsaem:~$ chmod +x start.sh

stop 스크립트를 작성합니다.

ubuntu@goodsaem:~$ vi stop.sh

아래와 같이 입력합니다. 프로세스를 찾아서 kill 하는 명령어 입니다.

#!/bin/sh

PID=`ps -ef | grep java | grep war | awk '{print $2}'`
if [ -n "$PID" ]
then
  echo "=====spring is running at" $PID "Shutdown spring now"
  kill -9 $PID
else
  echo "=====spring isn't running====="
fi

저장하고 종료합니다. log 출력 스크립트를 작성합니다.

ubuntu@goodsaem:~$ vi log.sh

아래와 같이 입력합니다

tail -f nohup.out

stop.sh 와 log.sh 각각 실행권한을 부여합니다.

ubuntu@goodsaem:~$ chmod +X start.sh
ubuntu@goodsaem:~$ chmod +X log.sh

서비스를 시작합니다.

ubuntu@goodsaem:~$ ./start.sh;./log.sh

아래와 같은 로그 확인이 가능합니다.

  .   ____          _            __ _ _
 /\\ / ___'_ __ _ _(_)_ __  __ _ \ \ \ \
( ( )\___ | '_ | '_| | '_ \/ _` | \ \ \ \
 \\/  ___)| |_)| | | | | || (_| |  ) ) ) )
  '  |____| .__|_| |_|_| |_\__, | / / / /
 =========|_|==============|___/=/_/_/_/
 :: Spring Boot ::                (v2.4.4)

2021-03-27 02:23:27.115  INFO 3532 --- [           main] g.github.io.hello.HelloApplication       : Starting HelloApplication using Java 1.8.0_282 on goodsaem with PID 3532 (/home/ubuntu/hello-0.0.1-SNAPSHOT.war started by ubuntu in /home/ubuntu)
2021-03-27 02:23:27.124  INFO 3532 --- [           main] g.github.io.hello.HelloApplication       : No active profile set, falling back to default profiles: default
2021-03-27 02:23:29.570  INFO 3532 --- [           main] o.s.b.w.embedded.tomcat.TomcatWebServer  : Tomcat initialized with port(s): 9090 (http)
2021-03-27 02:23:29.600  INFO 3532 --- [           main] o.apache.catalina.core.StandardService   : Starting service [Tomcat]
2021-03-27 02:23:29.606  INFO 3532 --- [           main] org.apache.catalina.core.StandardEngine  : Starting Servlet engine: [Apache Tomcat/9.0.44]
2021-03-27 02:23:30.416  INFO 3532 --- [           main] o.a.c.c.C.[.[localhost].[/spring]        : Initializing Spring embedded WebApplicationContext
2021-03-27 02:23:30.416  INFO 3532 --- [           main] w.s.c.ServletWebServerApplicationContext : Root WebApplicationContext: initialization completed in 3156 ms
2021-03-27 02:23:31.421  INFO 3532 --- [           main] o.s.s.concurrent.ThreadPoolTaskExecutor  : Initializing ExecutorService 'applicationTaskExecutor'
2021-03-27 02:23:31.886  INFO 3532 --- [           main] o.s.b.w.embedded.tomcat.TomcatWebServer  : Tomcat started on port(s): 9090 (http) with context path '/spring'
2021-03-27 02:23:31.908  INFO 3532 --- [           main] g.github.io.hello.HelloApplication       : Started HelloApplication in 6.02 seconds (JVM running for 6.993)

이제 ctrl + c 를 해도 프로세스가 종료되지 않습니다.


서비스 종료

아래 명령어로 서비스를 종료 합니다.

ubuntu@goodsaem:~$ ./stop.sh;./log.sh
=====spring is running at 3532 Shutdown spring now

다시 서비스를 시작합니다.

ubuntu@goodsaem:~$ ./start.sh;./log.sh


테스트

이제 실제로 https 로 접속을 시도해 보겠습니다. http://goodsaem.ml/spring/goodsaem/string (opens new window) https 프로토콜을 이용하여 설정한 도메인으로 접속하니 아래 그림과 같이 정상적으로 화면이 나왔습니다.


댓글()

[AWS 무료 서버구축-15/18] SSL 사이트 점검하기

Setup/aws|2021. 7. 25. 16:35

SSL 사이트 점검하기 

SSL이 제되로 생성되었는지 https://www.ssllabs.com/ssltest/analyze.html사이트에 접속하여 아래와 같이 도메인을 입력하고 점검을 수행합니다.

A 라고  표시되면 설정 상태가 정상입니다.

댓글()

[AWS 무료 서버구축-14/18] 무료로 SSL 인증 받기

Setup/aws|2021. 7. 25. 16:09

무료로 SSL 인증 받기

요즘 대부분은 사이트는 SSL 인증을 요구합니다. vue.js 공부를 위해 만든 https://goodsaem.github.io 사이트 역시 https로 동작하며 만약 여기에서 다른 사이트 데이터를 가져올려고 하면 https로만 통신이 됩니다. http로는 통신이 되지 않습니다. 그래서 ssl 인증 받는 부분을 추가 적용 합니다.


Let's Encrypt 와 Certbot을 이용한 ssl 무료 인증서를 발급 받는 방법에 대해서 알아 보겠습니다.


Diffie-Hellman 키 생성

https 인증서를 받기 위해서는 키가 필요합니다. 이 키 생성은 디피와 헬만이 1976년도에 발표한 비밀키 교환 방식의 알고리즘을 이용하여 생성합니다.이 알고리즘을 이용하여 4096 bit의 키를 생성하겠습니다. 아래 명령어로 키를 생성하는데 대략 10분정도 소요 되었습니다. 이키를 이용해서 https에서 비밀키를 교환하여 안정한 https 통신을 할수 있으므로 반드시 진행해야 되는 사항입니다.


ubuntu@goodsaem:~$ sudo openssl dhparam -out /etc/nginx/conf.d/ssl-dhparams.pem 4096
enerating DH parameters, 4096 bit long safe prime, generator 2
This is going to take a long time
...............................................................


Let's Encrypt + Certbot 무료인증

Let's Encrypt 는 사용자에게 무료로 SSL/TLS 인증서를 발급해 주는 기관 입니다. 한번 발급 받으면 90일간 사용이 가능하며 만료 30일전에 메일로 내용을 통보하면 그때 다시 갱신이 가능합니다. 인증서 발급은 certbot certbot-auto 를 이용하여 발급 및 갱신합니다.

certbot 등록을 위해 repository 등록을 진행합니다.

ubuntu@goodsaem:~$ sudo apt-get update
ubuntu@goodsaem:~$ sudo apt-get install software-properties-common
ubuntu@goodsaem:~$ sudo add-apt-repository universe
ubuntu@goodsaem:~$ sudo add-apt-repository ppa:certbot/certbot
ubuntu@goodsaem:~$ sudo apt-get update

certbot을 설치합니다.

ubuntu@goodsaem:~$ sudo apt-get install certbot

certbot nginx 플러그인을 설치 합니다.

ubuntu@goodsaem:~$ sudo apt-get install python-certbot-nginx

nginx에 서버 이름을 변경하기 위해 아래와 같이 입력합니다.

ubuntu@goodsaem:~$ sudo vi /etc/nginx/conf.d/default.conf

서버 네임을 freenom에서 발급받은 도메인으로 지정해 줍니다. 아래 server_name goodsaem.ml; 부분이 추가 되었습니다.

server {
    listen       80;
    server_name  goodsaem.ml;

    #charset koi8-r;
    #access_log  /var/log/nginx/host.access.log  main;

    location / {
        root   /usr/share/nginx/html;
        index  index.html index.htm;
    }

    location /spring {
        proxy_pass http://localhost:9090/spring;
        proxy_set_header X-Real-IP $remote_addr;
        proxy_set_header X-Forwarded-For $proxy_add_x_forwarded_for;
        proxy_set_header Host $http_host;
    }

    #error_page  404              /404.html;

    # redirect server error pages to the static page /50x.html
    #
    error_page   500 502 503 504  /50x.html;
    location = /50x.html {
        root   /usr/share/nginx/html;
    }

    # proxy the PHP scripts to Apache listening on 127.0.0.1:80
    #
    #location ~ \.php$ {
    #    proxy_pass   http://127.0.0.1;
    #}

    # pass the PHP scripts to FastCGI server listening on 127.0.0.1:9000
    #
    #location ~ \.php$ {
    #    root           html;
    #    fastcgi_pass   127.0.0.1:9000;
    #    fastcgi_index  index.php;
    #    fastcgi_param  SCRIPT_FILENAME  /scripts$fastcgi_script_name;
    #    include        fastcgi_params;
    #}

    # deny access to .htaccess files, if Apache's document root
    # concurs with nginx's one
    #
    #location ~ /\.ht {
    #    deny  all;
    #}
}

이제 아래 certbot 명령어를 통해서 ssl 인증서를 발급받습니다. 인증서 발급시 사용할 admin email 주소와 이용약관 동의 옵션을 지정하여 인증서 발급을 받겠습니다.

ubuntu@goodsaem:~$ sudo certbot --nginx --email goodsaem@protonmail.com --agree-tos

위에 명령어를 입력하면 아래와 같은 형태로 진행되는데요 중요한 부분만 설명하겠습니다.

  • 6 라인에 추가할 https 도메인이 보입니다.
  • 9 라인에서 엔터를 입력합니다.
  • 24 라인에서 2을 입력합니다. (http로 요청이 들어오면 https 로 redirect 하겠다는 의미 입니다.)
Saving debug log to /var/log/letsencrypt/letsencrypt.log
Plugins selected: Authenticator nginx, Installer nginx

Which names would you like to activate HTTPS for?
- - - - - - - - - - - - - - - - - - - - - - - - - - - - - - - - - - - - - - - -
1: goodsaem.ml
- - - - - - - - - - - - - - - - - - - - - - - - - - - - - - - - - - - - - - - -
Select the appropriate numbers separated by commas and/or spaces, or leave input
blank to select all options shown (Enter 'c' to cancel):
Obtaining a new certificate
Performing the following challenges:
http-01 challenge for goodsaem.ml
Waiting for verification...
Cleaning up challenges
Deploying Certificate to VirtualHost /etc/nginx/conf.d/default.conf

Please choose whether or not to redirect HTTP traffic to HTTPS, removing HTTP access.
- - - - - - - - - - - - - - - - - - - - - - - - - - - - - - - - - - - - - - - -
1: No redirect - Make no further changes to the webserver configuration.
2: Redirect - Make all requests redirect to secure HTTPS access. Choose this for
new sites, or if you're confident your site works on HTTPS. You can undo this
change by editing your web server's configuration.
- - - - - - - - - - - - - - - - - - - - - - - - - - - - - - - - - - - - - - - -
Select the appropriate number [1-2] then [enter] (press 'c' to cancel): 1

- - - - - - - - - - - - - - - - - - - - - - - - - - - - - - - - - - - - - - - -
Congratulations! You have successfully enabled https://goodsaem.ml

You should test your configuration at:
https://www.ssllabs.com/ssltest/analyze.html?d=goodsaem.ml
- - - - - - - - - - - - - - - - - - - - - - - - - - - - - - - - - - - - - - - -

IMPORTANT NOTES:
 - Congratulations! Your certificate and chain have been saved at:
   /etc/letsencrypt/live/goodsaem.ml/fullchain.pem
   Your key file has been saved at:
   /etc/letsencrypt/live/goodsaem.ml/privkey.pem
   Your cert will expire on 2021-06-23. To obtain a new or tweaked
   version of this certificate in the future, simply run certbot again
   with the "certonly" option. To non-interactively renew *all* of
   your certificates, run "certbot renew"
 - If you like Certbot, please consider supporting our work by:

   Donating to ISRG / Let's Encrypt:   https://letsencrypt.org/donate
   Donating to EFF:                    https://eff.org/donate-le

제되로 인증서 발급이 되었는지 확인해 보겠습니다. domain에 보시면 goodsaem.ml 도메인이 등록되어 있습니다. 또한 9,10 라인에 fullchain.pem 키와 privkey.pem 파일이 정상 생성되었음을 확인할수 있습니다.

ubuntu@goodsaem:~$ sudo certbot certificates
Saving debug log to /var/log/letsencrypt/letsencrypt.log

- - - - - - - - - - - - - - - - - - - - - - - - - - - - - - - - - - - - - - - -
Found the following certs:
  Certificate Name: goodsaem.ml
    Domains: goodsaem.ml
    Expiry Date: 2021-06-24 14:32:16+00:00 (VALID: 89 days)
    Certificate Path: /etc/letsencrypt/live/goodsaem.ml/fullchain.pem
    Private Key Path: /etc/letsencrypt/live/goodsaem.ml/privkey.pem
- - - - - - - - - - - - - - - - - - - - - - - - - - - - - - - - - - - - - - - -

nginx에 ssl 관련 설정이 등록되었는지 default.conf 내용을 확인해 보겠습니다. 51번라인부터 67번 라인까지 ssl 관련 설정이 자동으로 추가되었습니다.

server {
    server_name  goodsaem.ml;

    #charset koi8-r;
    #access_log  /var/log/nginx/host.access.log  main;

    location / {
        root   /usr/share/nginx/html;
        index  index.html index.htm;
    }

    location /spring {
        proxy_pass http://localhost:9090/spring;
        proxy_set_header X-Real-IP $remote_addr;
        proxy_set_header X-Forwarded-For $proxy_add_x_forwarded_for;
        proxy_set_header Host $http_host;
    }

    #error_page  404              /404.html;

    # redirect server error pages to the static page /50x.html
    #
    error_page   500 502 503 504  /50x.html;
    location = /50x.html {
        root   /usr/share/nginx/html;
    }

    # proxy the PHP scripts to Apache listening on 127.0.0.1:80
    #
    #location ~ \.php$ {
    #    proxy_pass   http://127.0.0.1;
    #}

    # pass the PHP scripts to FastCGI server listening on 127.0.0.1:9000
    #
    #location ~ \.php$ {
    #    root           html;
    #    fastcgi_pass   127.0.0.1:9000;
    #    fastcgi_index  index.php;
    #    fastcgi_param  SCRIPT_FILENAME  /scripts$fastcgi_script_name;
    #    include        fastcgi_params;
    #}

    # deny access to .htaccess files, if Apache's document root
    # concurs with nginx's one
    #
    #location ~ /\.ht {
    #    deny  all;
    #}

    listen 443 ssl; # managed by Certbot
    ssl_certificate /etc/letsencrypt/live/goodsaem.ml/fullchain.pem; # managed by Certbot
    ssl_certificate_key /etc/letsencrypt/live/goodsaem.ml/privkey.pem; # managed by Certbot
    include /etc/letsencrypt/options-ssl-nginx.conf; # managed by Certbot
    ssl_dhparam /etc/letsencrypt/ssl-dhparams.pem; # managed by Certbot

}

server {
    if ($host = goodsaem.ml) {
        return 301 https://$host$request_uri;
    } # managed by Certbot


    listen       80;
    server_name  goodsaem.ml;
    return 404; # managed by Certbot


}

letsencrypt 에 있는 Diffie-Hellman Key 를 아래와 같은 이름으로 백업합니다.

ubuntu@goodsaem:~$ cd /etc/letsencrypt/
ubuntu@goodsaem:~$  sudo mv ssl-dhparams.pem  ssl-dhparams.pem.backup

생성한 키 파일을 /etc/letsencrypt 로 복사합니다.

ubuntu@goodsaem:~$  sudo cp -rp /etc/nginx/conf.d/ssl-dhparams.pem /etc/letsencrypt/

nginx 를 재시작 합니다.

ubuntu@goodsaem:~$ sudo systemctl restart nginx


http 요청 https 로 자동포워딩

http://goodsaem.ml/ (opens new window)로 접속하면 https://goodsaem.ml/ 자동 포워딩되는지 확인합니다.

정상적으로 setup 되었다면 아래와 같은 화면을 확인할수 있습니다.


댓글()

[AWS 무료 서버구축-13/18] Nginx Springboot 연동

Setup/aws|2021. 7. 25. 15:53

Nginx Springboot 연동

http://goodsaem.ml/spring 로 접속하면 springboot가 응답하도록 nginx 설정을 변경하겠습니다


nginx 설정파일 수정

아래 명령어로 nginx 설정 파일을 수정 합니다.

ubuntu@goodsaem:~$ sudo vi /etc/nginx/conf.d/default.conf


아래와 같이 /spring 요청이 오면 14~17 라인 설정에 따라 springboot로 보내는 설정입니다. 그외 전체 nginx 설정이 있으니 참고 하시기 바랍니다

server {
    listen       80;
    server_name  localhost;

    #charset koi8-r;
    #access_log  /var/log/nginx/host.access.log  main;

    location / {
        root   /usr/share/nginx/html;
        index  index.html index.htm;
    }

    location /spring {
        proxy_pass http://localhost:9090/spring;
        proxy_set_header X-Real-IP $remote_addr;
        proxy_set_header X-Forwarded-For $proxy_add_x_forwarded_for;
        proxy_set_header Host $http_host;
    }

    #error_page  404              /404.html;

    # redirect server error pages to the static page /50x.html
    #
    error_page   500 502 503 504  /50x.html;
    location = /50x.html {
        root   /usr/share/nginx/html;
    }

    # proxy the PHP scripts to Apache listening on 127.0.0.1:80
    #
    #location ~ \.php$ {
    #    proxy_pass   http://127.0.0.1;
    #}

    # pass the PHP scripts to FastCGI server listening on 127.0.0.1:9000
    #
    #location ~ \.php$ {
    #    root           html;
    #    fastcgi_pass   127.0.0.1:9000;
    #    fastcgi_index  index.php;
    #    fastcgi_param  SCRIPT_FILENAME  /scripts$fastcgi_script_name;
    #    include        fastcgi_params;
    #}

    # deny access to .htaccess files, if Apache's document root
    # concurs with nginx's one
    #
    #location ~ /\.ht {
    #    deny  all;
    #}
}


Springboot 시작

업로드한 hello*.war 파일을 아래 명령어로 시작합니다.

ubuntu@goodsaem:~$ java -jar hello-0.0.1-SNAPSHOT.war

  .   ____          _            __ _ _
 /\\ / ___'_ __ _ _(_)_ __  __ _ \ \ \ \
( ( )\___ | '_ | '_| | '_ \/ _` | \ \ \ \
 \\/  ___)| |_)| | | | | || (_| |  ) ) ) )
  '  |____| .__|_| |_|_| |_\__, | / / / /
 =========|_|==============|___/=/_/_/_/
 :: Spring Boot ::                (v2.4.4)

2021-03-26 23:47:09.084  INFO 819 --- [           main] g.github.io.hello.HelloApplication       : Starting HelloApplication using Java 1.8.0_282 on goodsaem with PID 819 (/home/ubuntu/hello-0.0.1-SNAPSHOT.war started by ubuntu in /home/ubuntu)
2021-03-26 23:47:09.095  INFO 819 --- [           main] g.github.io.hello.HelloApplication       : No active profile set, falling back to default profiles: default
2021-03-26 23:47:11.586  INFO 819 --- [           main] o.s.b.w.embedded.tomcat.TomcatWebServer  : Tomcat initialized with port(s): 9090 (http)
2021-03-26 23:47:11.617  INFO 819 --- [           main] o.apache.catalina.core.StandardService   : Starting service [Tomcat]
2021-03-26 23:47:11.617  INFO 819 --- [           main] org.apache.catalina.core.StandardEngine  : Starting Servlet engine: [Apache Tomcat/9.0.44]
2021-03-26 23:47:12.505  INFO 819 --- [           main] o.a.c.c.C.[.[localhost].[/spring]        : Initializing Spring embedded WebApplicationContext
2021-03-26 23:47:12.505  INFO 819 --- [           main] w.s.c.ServletWebServerApplicationContext : Root WebApplicationContext: initialization completed in 3273 ms
2021-03-26 23:47:13.495  INFO 819 --- [           main] o.s.s.concurrent.ThreadPoolTaskExecutor  : Initializing ExecutorService 'applicationTaskExecutor'
2021-03-26 23:47:13.927  INFO 819 --- [           main] o.s.b.w.embedded.tomcat.TomcatWebServer  : Tomcat started on port(s): 9090 (http) with context path '/spring'
2021-03-26 23:47:13.955  INFO 819 --- [           main] g.github.io.hello.HelloApplication       : Started HelloApplication in 6.085 seconds (JVM running for 7.154)


springboot 테스트

http://goodsaem.ml/spring/goodsaem/string url 로 접속하여 아래와 같은 화면이 출력되면 nginx + springboot 연동 성공입니다.


안녕하세요 좋은 선생님 goodsaem! 입니다.

댓글()

[AWS 무료 서버구축-12/18] Springboot 프로젝트 생성

Setup/aws|2021. 7. 25. 15:48

Springboot 프로젝트 생성

aws freetier 리눅스 서버 구축 목적은 restapi 서버 역할입니다. 간단한 springboot 프로젝트를 생성 build 하여 war 파일을 만든다음 war 파일을 ec2 서버에 업로드 하는 부분까지 진행하겠습니다.


프로젝트 파일생성

https://start.spring.io/ 사이트에 접속하여 아래와 같이 입력합니다.

  1. project 는 Gradle Project
  2. Language 는 Java
  3. Spring Boot 는 2.4.4
  4. Group 은 goodsaem.github.io
  5. Artifact 는 hello
  6. Name 은 hello
  7. Packaging 은 War 선택
  8. Java 는 8 버전을 선택합니다.
  9. 그리고 나서 Generate 버튼을 클릭합니다.
  10. 파일을 다운로드 받고 적당한 위치에 압축을 푼후 해당 디렉토리로 이동합니다.


디렉토리 구조

압축을 풀고 나서 해당 디렉토리 구조를 확인하면 아래와 같습니다. 

HelloController.java. 와  application.yml 파일을 추가합니다.

.
├── build.gradle
└── src
    ├── main
    │  ├── java
    │  │  └── goodsaem
    │  │      └── github
    │  │          └── io
    │  │              └── hello
    │  │                  ├── HelloApplication.java
    │  │                  ├── HelloController.java
    │  │                  └── ServletInitializer.java
    │  └── resources
    │      ├── application.yml
    │      ├── static
    │      └── templates
    └── test
        └── java
            └── goodsaem
                └── github
                    └── io
                        └── hello
                            └── HelloApplicationTests.java


HelloController.java

goodsaem/string url로 접속하면 "안녕하세요 좋은 선생님 goodsaem! 입니다." 라고 출력하는 간단한 컨트롤러 입니다.

package goodsaem.github.io.hello;

import org.springframework.stereotype.Controller;
import org.springframework.web.bind.annotation.GetMapping;
import org.springframework.web.bind.annotation.ResponseBody;

@Controller
public class HelloController {

    private final String MSG="안녕하세요 좋은 선생님 goodsaem! 입니다.";

    @GetMapping(value = "/goodsaem/string")
    @ResponseBody
    public String getString() {
        return MSG;
    }
}


application.yml

서비스 포트를 9090 로 변경했고 context-path를 spring으로 지정하여 /spring으로 오는 요청은 모두 springboot에서 처리하게 만듭니다.


server:
  port: 9090
  servlet:
    context-path: /spring
    session:
      timeout: 60
      tomcat:
        uri-encoding: UTF-8


war파일 만들기

프로젝트 root 디렉토리에서 아래 명령어를 입력하면 war파일이 생성됩니다.

sh gradlew build


위 명령어를 실행하면 아래 위치에 hello-0.0.1-SNAPSHOT.war 파일이 생성됩니다.

.
└── build
      └── libs
            └── hello-0.0.1-SNAPSHOT.war


aws 에 파일업로드

파일 업로드는 파일 질라를 이용하서 진행하겠습니다.

  1. 호스트는 goodsaem.ml 이라고 입력합니다.
  2. 사용자는 ubuntu라고 입력합니다.
  3. 키파일은 aws ec2 서버 생성할때 만든 goodsaem.pem 파일을 선택합니다.
  4. 연결하기 버튼을 클릭하면 ec2 서버에 접속이 이루어 집니다.

libs 디렉토리에 hello-0.0.1-SNAPSHOT.war 파일을 사용자 home 디렉토리로 업로드 합니다.

댓글()

[AWS 무료 서버구축-11/18]Open Jdk 1.8 설치

Setup/aws|2021. 7. 25. 15:40

Open Jdk 1.8 설치

aws + ubuntu 18 linux 서버에 open jdk 설치 하는 방법입니다


설치

백엔드 서비스는 springboot에서 모두 처리할 예정입니다. springboot을 기동하기 위해 open jdk를 설치합니다.

ubuntu@goodsaem:~$ sudo apt install openjdk-8-jdk


jdk 버전확인

설치가 완료되었다면 jdk 버전을 확인합니다.

ubuntu@goodsaem:~$ java -version
openjdk version "1.8.0_282"
OpenJDK Runtime Environment (build 1.8.0_282-8u282-b08-0ubuntu1~18.04-b08)
OpenJDK 64-Bit Server VM (build 25.282-b08, mixed mode)

댓글()

[AWS 무료 서버구축-10/18] Maria DB 유저 생성 및 권한 부여

Setup/aws|2021. 7. 25. 15:36

Maria DB 유저 생성 및 권한 부여

mariadb 유저 생성 및 권한 주는 방법입니다.


생성한 데이터베이스를 사용할 유저를 생성합니다.

MariaDB [(none)]> CREATE USER goodsaem@localhost identified by 'xxxxxxxxxx';
Query OK, 0 rows affected (0.009 sec)

생성한 유저에게 신규 데이터베이스의 모든 권한을 부여 합니다.

MariaDB [(none)]> grant all privileges on goodsaem.* to 'goodsaem'@'localhost';
Query OK, 0 rows affected (0.012 sec)

변경된 내용을 적용합니다.

MariaDB [none]> flush privileges;
Query OK, 0 rows affected (0.000 sec)

댓글()

[AWS 무료 서버구축-9/18] Maria DB 데이터 베이스 생성

Setup/aws|2021. 7. 25. 15:34

Maria DB 데이터 베이스 생성 

mariadb 에 접속합니다.

ubuntu@goodsaem:~$ sudo mariadb

아래 명령어로 데이터 베이스를 생성합니다.

MariaDB [(none)]> create database goodsaem;
Query OK, 1 row affected (0.001 sec)

생성된 데이터 베이스를 확인합니다.

MariaDB [(none)]> show databases;
+--------------------+
| Database           |
+--------------------+
| goodsaem           |
| information_schema |
| mysql              |
| performance_schema |
+--------------------+
4 rows in set (0.001 sec)

댓글()